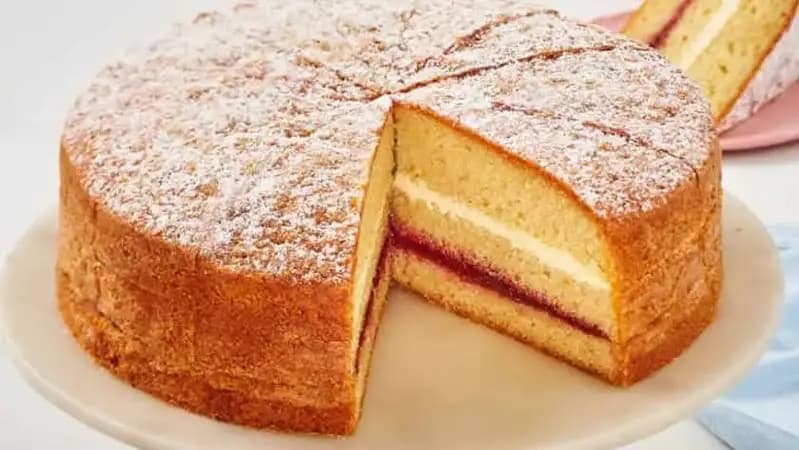
Mary Berry’s 10-inch Sponge Cake is an ideal base for any celebration. You can layer it with jam and cream or serve it with fresh fruit for a light and fluffy treat. This versatile and delicious cake is easy to make, making it perfect for birthdays, weddings, or any special event.
What is Mary Berry’s 10-inch Sponge Cake?
Mary Berry’s 10-inch Sponge Cake is a larger version of her classic Victoria sponge, designed to serve a crowd. It features a soft, buttery texture and a light crumb, thanks to the use of self-raising flour, eggs, and sugar. This cake is ideal for layering with buttercream, jam, or fresh fruit, making it a versatile option for various occasions. The result is a fluffy, golden sponge that’s both simple and elegant.
Other Popular Recipes
- Mary Berry All-In-One Victoria Sponge Cake
- James Martin Victoria Sponge
- Mary Berry Victoria Sponge with Buttercream
Why You Should Try This Recipe
- Ideal for celebrations: A 10-inch sponge is perfect for feeding a crowd at special events.
- Light and fluffy: The cake has a wonderfully light texture that melts in your mouth.
- Simple to make: With basic ingredients, this recipe is easy enough for bakers of all levels.
- Customizable: Add your favorite fillings, such as jam, buttercream, or fresh fruit.
- Classic British bake: It’s a timeless recipe that never goes out of style.
Ingredients Needed to Make Mary Berry’s 10-Inch Sponge Cake
For the Sponge:
- Self-raising flour: 350g
- Caster sugar: 350g
- Butter: 350g, softened
- Baking powder: 2 teaspoons
- Eggs: 6 large
- Vanilla extract: 1 teaspoon (optional)
- Milk: 2 tablespoons (optional, to loosen the batter)
For the Filling (optional):
- Strawberry jam: 6-8 tablespoons
- Whipped cream or buttercream: 300ml
Equipment
- 2 x 10-inch (25cm) round cake tins
- Electric mixer or hand whisk
- Mixing bowls
- Spatula
- Baking parchment
Instructions to Make Mary Berry’s 10-inch Sponge Cake
Step 1: Prepare the Cake Tins
- Preheat the oven: Set your oven to 180°C (160°C fan)/350°F/gas mark 4.
- Prepare the tins: Grease and line two 10-inch round cake tins with baking parchment.
Step 2: Make the Cake Batter
- Cream the butter and sugar: In a large mixing bowl, beat the softened butter and caster sugar together until pale and fluffy using an electric mixer.
- Add the eggs: Beat in the eggs one at a time, ensuring each one is fully incorporated before adding the next.
- Fold in the dry ingredients: Sift the self-raising flour and baking powder into the mixture and gently fold it in using a spatula. Add the vanilla extract and milk if needed to create a smooth batter.
Step 3: Bake the Cakes
- Divide the batter: Evenly divide the batter between the two prepared tins and smooth the tops.
- Bake: Place the tins in the preheated oven and bake for 30-35 minutes, or until the cakes are golden and a skewer inserted into the center comes out clean.
- Cool the cakes: Allow the cakes to cool in the tins for 10 minutes before turning them out onto a wire rack to cool completely.
Step 4: Fill and Assemble the Cake
- Spread the filling: Once the cakes have completely cooled, spread one cake with a generous layer of strawberry jam. If using, spread the other with whipped cream or buttercream.
- Sandwich the cakes: Place the second cake on top of the first to create a sandwich, pressing gently to secure.
Step 5: Decorate and Serve
- Dust with icing sugar: For a simple finish, dust the top of the cake with icing sugar before serving.
What Goes Well With Mary Berry’s 10-Inch Sponge Cake?
- Fresh fruit: Serve with sliced strawberries or raspberries for a fruity burst.
- Whipped cream: Lightly whipped cream pairs beautifully with the soft sponge.
- Custard: Pour warm custard over the cake for a comforting dessert.
- Lemon curd: Add a tangy layer of lemon curd for extra flavor.
- Tea or coffee: This cake is perfect with a hot cup of tea or coffee.
Expert Tips for Making the Best Sponge Cake
- Use room temperature ingredients: Ensure the butter and eggs are at room temperature for a smooth batter.
- Don’t overmix: Gently fold in the flour to keep the batter light and prevent a dense cake.
- Test for doneness: Insert a skewer into the center of the cake – if it comes out clean, the cake is ready.
- Cool completely before filling: Allow the cakes to cool fully before adding any filling to prevent the cream from melting.
Easy Variations of Mary Berry’s 10-Inch Sponge Cake
- Lemon sponge: Add the zest of two lemons to the batter for a zesty lemon version.
- Chocolate sponge: Substitute 50g of the self-raising flour with cocoa powder for a chocolate sponge.
- Gluten-free option: Use a gluten-free self-raising flour blend to make this cake suitable for gluten-intolerant guests.
- Coconut sponge: Add desiccated coconut to the batter for a tropical twist.
Best Practices to Store Mary Berry’s 10-Inch Sponge Cake
- Refrigeration: Store the cake in an airtight container at room temperature for up to 3 days. If filled with cream, keep it in the fridge.
- Freezing: You can freeze the sponge layers before filling. Wrap each layer tightly in cling film and store in the freezer for up to 2 months.
Best Practices to Reheat Mary Berry’s 10-Inch Sponge Cake
- Microwave reheating: Reheat individual slices in the microwave for 10-15 seconds on medium power for a quick refresh.
- Oven reheating: Warm slices in a 150°C (300°F) oven for 5-10 minutes to revive their freshness.
How Can I Make Sponge Cake Healthier?
- Reduce sugar: You can reduce the sugar by 10-15% without losing too much sweetness.
- Use whole-wheat flour: Swap part of the self-raising flour for whole-wheat flour to add fiber.
- Lighter filling: Replace the buttercream with a low-fat cream or Greek yogurt for a healthier filling.
Nutrition Value (per serving):
- Calories: 350 kcal
- Carbohydrates: 45g
- Protein: 6g
- Fat: 15g
- Fiber: 1g
FAQs
How do I adjust the ingredients for a 10-inch sponge cake?
To make a 10-inch sponge cake, you can scale up the ingredients by using approximately 350g of flour, sugar, and butter, and 6 large eggs. This ensures the cake has enough batter to fill the larger tins while maintaining the light, fluffy texture.
How long should I bake a 10-inch sponge cake?
A 10-inch sponge cake typically needs to bake for 30-35 minutes at 180°C (160°C fan)/350°F. Always check for doneness by inserting a skewer into the center – it should come out clean.
Can I freeze Mary Berry’s 10-inch sponge cake?
Yes, you can freeze the sponge layers. Wrap each layer tightly in cling film and foil, and freeze for up to 2 months. Thaw them at room temperature before assembling and decorating.
How do I prevent my sponge cake from sinking in the middle?
To prevent your sponge cake from sinking, ensure you don’t overmix the batter and avoid opening the oven door too early during baking. Make sure the oven is fully preheated and check for doneness with a skewer before removing the cake.
Final Words
Mary Berry’s 10-inch Sponge Cake is the perfect centerpiece for any celebration. Light, fluffy, and versatile, this classic sponge cake is easy to make and a joy to eat.
More By British Baking Recipes
- Mary Berry Lemon Sponge Cake
- Mary Berry Fatless Sponge Cake
- Mary Berry 8 Inch Sponge Cake
- Mary Berry 9 Inch Sponge Cake

Mary Berry 10-Inch Sponge Cake
- Prep Time: 20
- Cook Time: 35
- Total Time: 55 minutes
- Yield: 12
- Category: Dessert
- Method: Baking
- Cuisine: British
Description
Mary Berry’s 10-Inch Sponge Cake is a larger version of her classic Victoria sponge, designed to serve a crowd. It features a soft, buttery texture and a light crumb, thanks to the use of self-raising flour, eggs, and sugar. This cake is ideal for layering with buttercream, jam, or fresh fruit, making it a versatile option for various occasions. The result is a fluffy, golden sponge that’s both simple and elegant.
Ingredients
For the Sponge:
- Self-raising flour: 350g
- Caster sugar: 350g
- Butter: 350g, softened
- Baking powder: 2 teaspoons
- Eggs: 6 large
- Vanilla extract: 1 teaspoon (optional)
- Milk: 2 tablespoons (optional, to loosen the batter)
For the Filling (optional):
- Strawberry jam: 6-8 tablespoons
- Whipped cream or buttercream: 300ml
Instructions
Step 1: Prepare the Cake Tins
- Preheat the oven: Set your oven to 180°C (160°C fan)/350°F/gas mark 4.
- Prepare the tins: Grease and line two 10-inch round cake tins with baking parchment.
Step 2: Make the Cake Batter
- Cream the butter and sugar: In a large mixing bowl, beat the softened butter and caster sugar together until pale and fluffy using an electric mixer.
- Add the eggs: Beat in the eggs one at a time, ensuring each one is fully incorporated before adding the next.
- Fold in the dry ingredients: Sift the self-raising flour and baking powder into the mixture and gently fold it in using a spatula. Add the vanilla extract and milk if needed to create a smooth batter.
Step 3: Bake the Cakes
- Divide the batter: Evenly divide the batter between the two prepared tins and smooth the tops.
- Bake: Place the tins in the preheated oven and bake for 30-35 minutes, or until the cakes are golden and a skewer inserted into the center comes out clean.
- Cool the cakes: Allow the cakes to cool in the tins for 10 minutes before turning them out onto a wire rack to cool completely.
Step 4: Fill and Assemble the Cake
- Spread the filling: Once the cakes have completely cooled, spread one cake with a generous layer of strawberry jam. If using, spread the other with whipped cream or buttercream.
- Sandwich the cakes: Place the second cake on top of the first to create a sandwich, pressing gently to secure.
Step 5: Decorate and Serve
- Dust with icing sugar: For a simple finish, dust the top of the cake with icing sugar before serving.