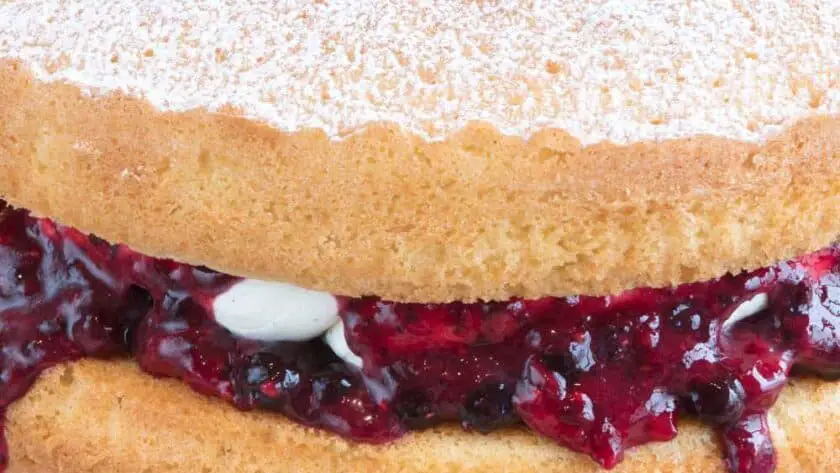
The Mary Berry Gluten-Free Victoria Sponge is a classic British cake made with light, airy sponge layers sandwiched with raspberry jam and fresh whipped cream. This gluten-free version maintains the traditional flavor and texture, making it perfect for afternoon tea or any celebration.
What is Mary Berry Gluten-Free Victoria Sponge?
Mary Berry’s Gluten-Free Victoria Sponge offers all the elements of a classic Victoria sponge but without gluten. The gluten-free flour keeps the sponge light and airy, and with a layer of jam and cream in the middle, this cake is deliciously simple and elegant.

Other Popular Recipes
Why You Should Try This Recipe
- Classic flavor: Enjoy the traditional taste of Victoria sponge without gluten.
- Light and fluffy: The cake is soft and airy, perfect for tea time or dessert.
- Simple ingredients: Uses basic pantry ingredients and gluten-free flour.
- Great for gatherings: This cake is always a crowd-pleaser and perfect for celebrations.
- Easy to customize: Use your favorite jam or add fresh berries to the filling.
Ingredients Needed to Make Mary Berry Gluten-Free Victoria Sponge
For the Cake:
- Butter (175g, softened): Adds moisture and richness.
- Caster sugar (175g): Sweetens the cake and helps it brown.
- Gluten-free self-raising flour (175g): Provides structure without gluten.
- Baking powder (1 tsp): Ensures a light, fluffy sponge.
- Eggs (3 large): Helps bind and add richness to the batter.
- Milk (1-2 tbsp): Loosens the batter for a smoother consistency.
- Vanilla extract (1 tsp): Adds a subtle, classic flavor.
For the Filling:
- Raspberry jam (4-5 tbsp): Adds sweetness and a slight tartness.
- Whipping cream (200ml, whipped): Adds a light, creamy texture.
- Icing sugar (for dusting): To give a classic finish.
Optional Add-Ins:
- Fresh raspberries or strawberries: For an extra burst of flavor in the filling.
Equipment Needed
- Mixing bowl: For combining the ingredients.
- Electric mixer: To cream the butter and sugar.
- Two 8-inch round cake tins: Greased and lined for easy removal.
- Spatula: For spreading the batter and filling.
Instructions to Make Mary Berry Gluten-Free Victoria Sponge
Step 1: Preheat the Oven and Prepare the Tins
- Preheat your oven to 180°C (350°F) or 160°C (fan).
- Grease and line the base of two 8-inch round cake tins with parchment paper.
Step 2: Cream the Butter and Sugar
- In a large mixing bowl, cream the softened butter and caster sugar together until light and fluffy, which takes about 2-3 minutes with an electric mixer.
Step 3: Add the Eggs and Vanilla
- Add the eggs one at a time, mixing well after each addition to incorporate fully.
- Stir in the vanilla extract for a smooth, fragrant batter.
Step 4: Add the Dry Ingredients
- Sift in the gluten-free self-raising flour and baking powder.
- Gently fold the dry ingredients into the wet mixture until just combined.
- If needed, add 1-2 tablespoons of milk to create a smooth, pourable consistency.
Step 5: Divide and Bake the Batter
- Divide the batter evenly between the two prepared cake tins, smoothing the tops with a spatula.
- Bake in the preheated oven for 20-25 minutes, or until the sponges are golden and a skewer inserted into the center comes out clean.
Step 6: Cool the Cakes
- Allow the cakes to cool in the tins for 5-10 minutes, then transfer to a wire rack to cool completely.
Step 7: Assemble the Cake
- Place one sponge layer on a serving plate and spread the raspberry jam evenly over the top.
- Spread the whipped cream over the jam layer, then carefully place the second sponge layer on top.
Step 8: Finish with Icing Sugar
- Dust the top of the cake with icing sugar for a classic finish. Add fresh raspberries or strawberries on top if desired.

What Goes Well with Mary Berry Gluten-Free Victoria Sponge?
- Fresh berries: Raspberries, strawberries, or blueberries add a pop of color and flavor.
- Tea or coffee: Perfect for an afternoon tea setting.
- Lemon curd: Adds a citrusy twist to the filling.
- Mint leaves: A few fresh mint leaves add aroma and a fresh touch.
- Chocolate drizzle: For a more decadent variation, drizzle melted chocolate on top.
Expert Tips for Making the Best Mary Berry Gluten-Free Victoria Sponge
- Use room temperature ingredients: Room temperature butter and eggs blend more easily, resulting in a lighter sponge.
- Don’t overmix: Fold ingredients gently to keep the cake light and airy.
- Test for doneness: Insert a skewer; if it comes out clean, the cake is ready.
- Whip the cream just before serving: This keeps the filling fresh and stable.
Easy Variations of Mary Berry Gluten-Free Victoria Sponge
- Berry-filled sponge: Add sliced strawberries or blueberries along with the jam.
- Chocolate Victoria sponge: Add 2 tablespoons of cocoa powder to the flour for a chocolate version.
- Lemon sponge: Add lemon zest to the batter and use lemon curd in the filling for a citrus twist.
- Coconut sponge: Add a few tablespoons of desiccated coconut for a tropical flavor.
Best Practices to Store Mary Berry Gluten-Free Victoria Sponge
- Room temperature: If served within the same day, keep at room temperature in an airtight container.
- Refrigerate for longer storage: Refrigerate in an airtight container for up to 3 days, allowing it to come to room temperature before serving.
Best Practices to Serve Mary Berry Gluten-Free Victoria Sponge
Serve at room temperature with a dusting of icing sugar. For a fresh twist, add berries or a dollop of cream on the side.
Nutrition Value (per serving):
- Calories: 260
- Fat: 15g
- Carbohydrates: 28g
- Protein: 4g
- Fiber: 1g
FAQs
Can I make Mary Berry Gluten-Free Victoria Sponge ahead of time?
Yes, you can make the sponge layers a day in advance. Store them in an airtight container at room temperature, then add the jam and whipped cream filling just before serving to keep the cake fresh and prevent it from becoming soggy.
How do I keep a gluten-free Victoria sponge moist?
To keep the cake moist, use room temperature ingredients and avoid overbaking. Adding a bit of milk to the batter can also help. Store the assembled cake in an airtight container in the refrigerator if not serving right away.
Can I freeze gluten-free Victoria sponge?
Yes, you can freeze the unfilled sponge layers. Wrap each layer in plastic wrap and freeze for up to 3 months. Thaw completely at room temperature, then add the filling just before serving.
What gluten-free flour works best for Victoria sponge?
A gluten-free self-raising flour blend specifically for baking works best to achieve a light, fluffy texture. Ensure it contains xanthan gum or add a small amount to help with structure.
Final Words
The Mary Berry Gluten-Free Victoria Sponge is a delicious, light cake that’s perfect for any occasion. With its soft sponge, raspberry jam, and whipped cream filling, this gluten-free version retains all the charm of the classic Victoria sponge. Enjoy with a cup of tea, and savor each delicate, fluffy bite!
More By British Baking Recipe
Print
Mary Berry Gluten Free Victoria Sponge
- Prep Time: 15
- Cook Time: 25
- Total Time: 40 minutes
- Yield: 8
- Category: Dessert
- Method: Baking
- Cuisine: British
Description
Mary Berry’s Gluten-Free Victoria Sponge offers all the elements of a classic Victoria sponge but without gluten. The gluten-free flour keeps the sponge light and airy, and with a layer of jam and cream in the middle, this cake is deliciously simple and elegant.
Ingredients
For the Cake:
- Butter (175g, softened): Adds moisture and richness.
- Caster sugar (175g): Sweetens the cake and helps it brown.
- Gluten-free self-raising flour (175g): Provides structure without gluten.
- Baking powder (1 tsp): Ensures a light, fluffy sponge.
- Eggs (3 large): Helps bind and add richness to the batter.
- Milk (1-2 tbsp): Loosens the batter for a smoother consistency.
- Vanilla extract (1 tsp): Adds a subtle, classic flavor.
For the Filling:
- Raspberry jam (4-5 tbsp): Adds sweetness and a slight tartness.
- Whipping cream (200ml, whipped): Adds a light, creamy texture.
- Icing sugar (for dusting): To give a classic finish.
Optional Add-Ins:
- Fresh raspberries or strawberries: For an extra burst of flavor in the filling.
Instructions
Step 1: Preheat the Oven and Prepare the Tins
- Preheat your oven to 180°C (350°F) or 160°C (fan).
- Grease and line the base of two 8-inch round cake tins with parchment paper.
Step 2: Cream the Butter and Sugar
- In a large mixing bowl, cream the softened butter and caster sugar together until light and fluffy, which takes about 2-3 minutes with an electric mixer.
Step 3: Add the Eggs and Vanilla
- Add the eggs one at a time, mixing well after each addition to incorporate fully.
- Stir in the vanilla extract for a smooth, fragrant batter.
Step 4: Add the Dry Ingredients
- Sift in the gluten-free self-raising flour and baking powder.
- Gently fold the dry ingredients into the wet mixture until just combined.
- If needed, add 1-2 tablespoons of milk to create a smooth, pourable consistency.
Step 5: Divide and Bake the Batter
- Divide the batter evenly between the two prepared cake tins, smoothing the tops with a spatula.
- Bake in the preheated oven for 20-25 minutes, or until the sponges are golden and a skewer inserted into the center comes out clean.
Step 6: Cool the Cakes
- Allow the cakes to cool in the tins for 5-10 minutes, then transfer to a wire rack to cool completely.
Step 7: Assemble the Cake
- Place one sponge layer on a serving plate and spread the raspberry jam evenly over the top.
- Spread the whipped cream over the jam layer, then carefully place the second sponge layer on top.
Step 8: Finish with Icing Sugar
- Dust the top of the cake with icing sugar for a classic finish. Add fresh raspberries or strawberries on top if desired.


