Puff pastry is a classic pastry that’s beloved for its light, flaky layers and buttery flavor. The Mary Berry Puff Pastry Recipe is a traditional version that requires patience and precision, but the results are well worth the effort. This guide will walk you through the entire process, ensuring you achieve a perfect, golden puff pastry that can be used for both sweet and savory dishes.
What is Mary Berry Puff Pastry?
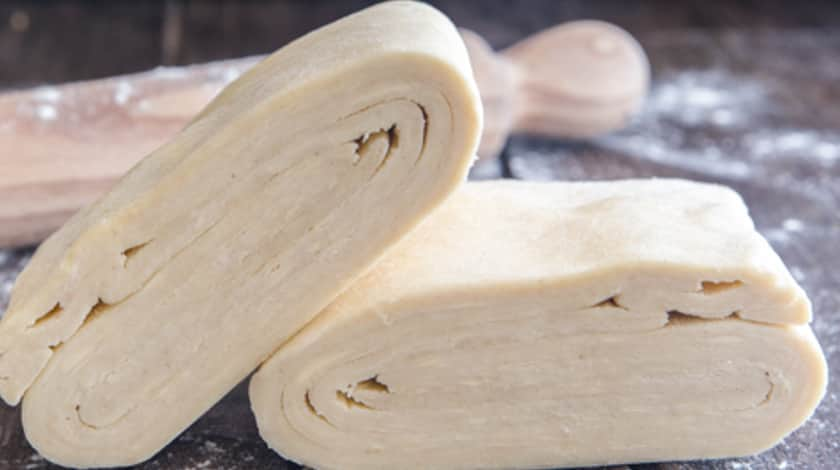
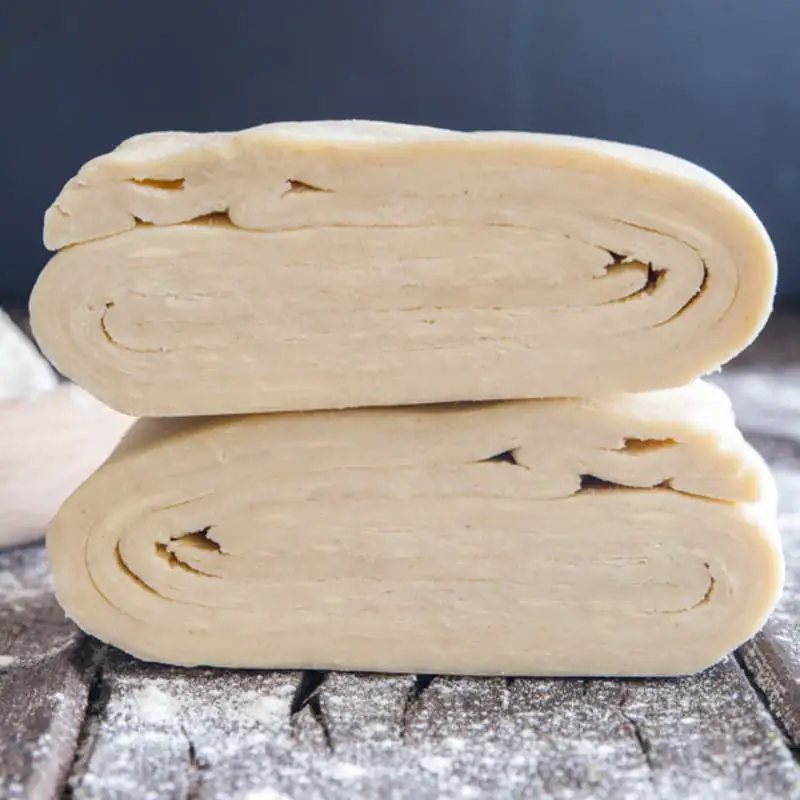
Puff pastry is a laminated dough that consists of alternating layers of dough and butter. When baked, the water in the butter evaporates, causing the layers to puff up and create a light, airy texture. Mary Berry’s puff pastry recipe is time-honored and produces beautifully crisp, golden layers that are ideal for a variety of culinary applications, from elegant desserts to hearty pies.
Other Popular Recipes
Why You Should Try This Recipe
- Classic Technique: Mastering puff pastry is a rite of passage for any serious baker.
- Versatile: Perfect for both sweet and savory dishes, from croissants to vol-au-vents.
- Buttery and Flaky: The careful layering process creates a rich, buttery flavor with a light, flaky texture.
- Impressive Results: Homemade puff pastry is a showstopper that will impress your family and guests.
- Make-Ahead Friendly: Puff pastry can be made in advance and stored, allowing for quick assembly of dishes later.
Ingredients Needed to Make Mary Berry Puff Pastry
- 250g (9 oz) plain flour
- 250g (9 oz) cold unsalted butter
- 1/2 tsp salt
- 150ml (5 fl oz) cold water
- A squeeze of lemon juice (optional)
Equipment
- Mixing bowl
- Rolling pin
- Pastry brush
- Cling film
- Baking tray
- Ruler (optional, for precise folding)
Instructions to Make Mary Berry Puff Pastry
Step 1: Prepare the Dough
- In a large mixing bowl, sift together the 250g of plain flour and 1/2 teaspoon of salt. Make a well in the center and add the 150ml of cold water and a squeeze of lemon juice (if using). Mix the ingredients together until a soft dough forms. The lemon juice helps to strengthen the gluten, resulting in a better rise.
Step 2: Prepare the Butter Block
- On a lightly floured surface, shape the cold butter into a flat square, about 1cm (1/2 inch) thick. Wrap the butter block in cling film and chill it in the refrigerator for about 10-15 minutes to firm up.
Step 3: Encase the Butter
- Roll out the dough on a lightly floured surface into a rectangle about twice the size of your butter block. Place the chilled butter block in the center of the dough. Fold the dough over the butter, encasing it completely. Ensure the edges are sealed tightly to prevent the butter from escaping during rolling.
Step 4: First Rolling and Folding (Turn 1)
- Roll the dough out gently into a long rectangle, approximately three times as long as it is wide. Fold the top third of the dough down to the center, then fold the bottom third up over the top, like folding a letter. This process is known as a “turn.” Rotate the dough 90 degrees so that the folded edges are facing you.
Step 5: Chill the Dough
- Wrap the dough in cling film and refrigerate for 20-30 minutes. This rest period allows the gluten to relax and the butter to firm up again.
Step 6: Second and Third Turns
- Repeat the rolling and folding process (Step 4) two more times, chilling the dough for 20-30 minutes between each turn. After the third turn, the dough should have multiple layers of butter and dough, creating the flaky structure of puff pastry.
Step 7: Final Chill and Use
- After completing the turns, wrap the dough tightly in cling film and chill it in the refrigerator for at least 1 hour before using. This final rest ensures the dough is firm and easy to work with when shaping and baking.
Step 8: Roll Out and Bake
- When ready to use, roll the chilled dough out on a lightly floured surface to your desired thickness. Cut and shape the dough as needed for your recipe. Bake in a preheated oven at 200°C (400°F) until puffed and golden brown, typically for 15-25 minutes depending on the size and shape of the pastry.
What Goes Well With Mary Berry Puff Pastry
Puff pastry is incredibly versatile and pairs beautifully with a variety of fillings and toppings:
- Apple Turnovers: Sweet, spiced apple filling encased in flaky pastry.
- Beef Wellington: A savory classic where puff pastry encases tender beef fillet.
- Vol-au-Vents: Puff pastry shells filled with creamy chicken, seafood, or vegetable fillings.
- Palmiers: Sweet puff pastry cookies with a caramelized sugar coating.
- Fruit Tarts: A base of puff pastry topped with fresh fruits and a light glaze.
- Sausage Rolls: A British favorite where seasoned sausage meat is wrapped in puff pastry.
Expert Tips for Making the Best Mary Berry Puff Pastry
To achieve the best results with your puff pastry, consider these expert tips:
- Keep Everything Cold: Cold ingredients and surfaces are crucial to prevent the butter from melting into the dough.
- Work Quickly: The quicker you work, the less likely the butter will soften, ensuring distinct layers.
- Rest Between Turns: Chilling the dough between turns helps maintain the integrity of the layers.
- Flour Lightly: Use just enough flour to prevent sticking, but not so much that it dries out the dough.
- Avoid Over-Rolling: Roll the dough evenly without pressing too hard, as this can compress the layers.
Easy Variations of Mary Berry Puff Pastry
Here are a few ways to customize your puff pastry:
- Herb-Infused Puff Pastry: Add finely chopped fresh herbs to the dough for a savory twist.
- Cheese Puff Pastry: Incorporate grated cheese like Parmesan into the dough for a rich, savory pastry.
- Whole Wheat Puff Pastry: Substitute half of the plain flour with whole wheat flour for a nuttier flavor.
- Spiced Puff Pastry: Mix in a small amount of ground spices like cinnamon or nutmeg for a fragrant pastry.
- Chocolate Puff Pastry: Spread a thin layer of melted chocolate between the layers for a decadent dessert.
Best Practices to Store Mary Berry Puff Pastry
Proper storage is essential to maintain the quality of your puff pastry:
- Refrigerate Unused Dough: Wrap unused dough tightly in cling film and refrigerate for up to 3 days.
- Freeze for Later Use: Puff pastry can be frozen for up to 1 month. Thaw overnight in the refrigerator before using.
- Store Baked Pastry: Baked puff pastry can be stored in an airtight container at room temperature for up to 2 days.
Best Practices to Reheat Mary Berry Puff Pastry
Reheating puff pastry while maintaining its crispness is simple with these steps:
- Oven Reheating: Reheat baked puff pastry in a preheated oven at 180°C (350°F) for 5-10 minutes to restore crispness.
- Avoid Microwaving: Microwaving can make the pastry soggy, so it’s best to reheat it in the oven.
How Can I Make Mary Berry Puff Pastry Healthier?
For a healthier version of puff pastry, consider these adjustments:
- Use Less Butter: Reduce the amount of butter slightly to cut down on fat content.
- Incorporate Whole Grains: Substitute some of the plain flour with whole wheat flour for added fiber.
- Add Seeds: Mix in ground flaxseeds or chia seeds to the dough for a nutritional boost.
Nutrition Value (per serving)
- Calories: 250
- Carbohydrates: 22g
- Protein: 3g
- Fat: 17g
- Sodium: 150mg
Final Words
The Mary Berry Puff Pastry Recipe is a must-try for anyone who enjoys baking. Its rich, buttery layers and light, flaky texture make it perfect for a variety of dishes, from elegant desserts to savory classics. While it requires patience and precision, the results are well worth the effort. Whether you’re making sweet pastries or savory pies, this puff pastry will elevate your baking to new heights. Enjoy the process and the delicious rewards that follow.
More By British Baking Recipes
Print
Mary Berry Puff Pastry Recipe
- Prep Time: 90
- Cook Time: 30
- Total Time: 2 hours
- Yield: 8 1x
- Category: Pastry
- Method: Baking
- Cuisine: French
Description
Puff pastry is a laminated dough that consists of alternating layers of dough and butter. When baked, the water in the butter evaporates, causing the layers to puff up and create a light, airy texture. Mary Berry’s puff pastry recipe is time-honored and produces beautifully crisp, golden layers that are ideal for a variety of culinary applications, from elegant desserts to hearty pies.
Ingredients
- 250g (9 oz) plain flour
- 250g (9 oz) cold unsalted butter
- 1/2 tsp salt
- 150ml (5 fl oz) cold water
- A squeeze of lemon juice (optional)
Instructions
Step 1: Prepare the Dough
- In a large mixing bowl, sift together the 250g of plain flour and 1/2 teaspoon of salt. Make a well in the center and add the 150ml of cold water and a squeeze of lemon juice (if using). Mix the ingredients together until a soft dough forms. The lemon juice helps to strengthen the gluten, resulting in a better rise.
Step 2: Prepare the Butter Block
- On a lightly floured surface, shape the cold butter into a flat square, about 1cm (1/2 inch) thick. Wrap the butter block in cling film and chill it in the refrigerator for about 10-15 minutes to firm up.
Step 3: Encase the Butter
- Roll out the dough on a lightly floured surface into a rectangle about twice the size of your butter block. Place the chilled butter block in the center of the dough. Fold the dough over the butter, encasing it completely. Ensure the edges are sealed tightly to prevent the butter from escaping during rolling.
Step 4: First Rolling and Folding (Turn 1)
- Roll the dough out gently into a long rectangle, approximately three times as long as it is wide. Fold the top third of the dough down to the center, then fold the bottom third up over the top, like folding a letter. This process is known as a “turn.” Rotate the dough 90 degrees so that the folded edges are facing you.
Step 5: Chill the Dough
- Wrap the dough in cling film and refrigerate for 20-30 minutes. This rest period allows the gluten to relax and the butter to firm up again.
Step 6: Second and Third Turns
- Repeat the rolling and folding process (Step 4) two more times, chilling the dough for 20-30 minutes between each turn. After the third turn, the dough should have multiple layers of butter and dough, creating the flaky structure of puff pastry.
Step 7: Final Chill and Use
- After completing the turns, wrap the dough tightly in cling film and chill it in the refrigerator for at least 1 hour before using. This final rest ensures the dough is firm and easy to work with when shaping and baking.
Step 8: Roll Out and Bake
- When ready to use, roll the chilled dough out on a lightly floured surface to your desired thickness. Cut and shape the dough as needed for your recipe. Bake in a preheated oven at 200°C (400°F) until puffed and golden brown, typically for 15-25 minutes depending on the size and shape of the pastry.

